Quest 10 & 11 are up. These are two-parters, and WIP.
 Quest 10 - In the Night Season.
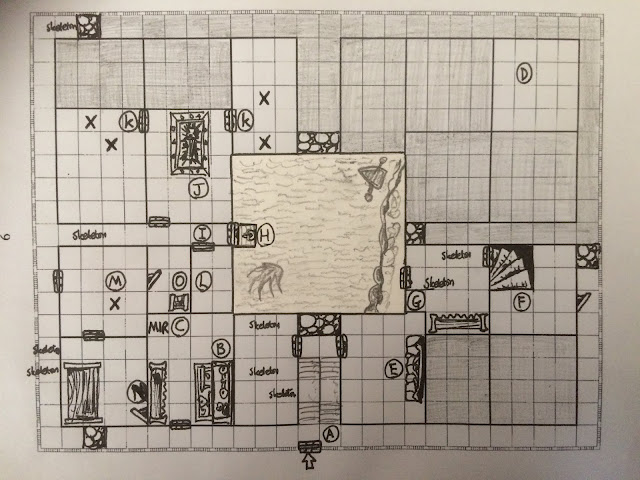
Part I, The Lich-wayThe Heroes' Tale (continued)..."After the epic battle under Mt Anger the journey bag brought all of you far to the South, to the edge of the Old World. It took you some time to realise that you were in Knocklor, an Eldritch country beyond Blackfire Pass. It was from this wild wasteland of fells and fens that, in ancient times, the Witch Lord sent his legions against the living. Fortunately he was defeated by Heroes of that bygone era. There are those who say he lives buried at the heart of one of the granite tors that you can see thrusting up from the barren moorland, above the low-lying fog.
Of course, you prefer the warmth of this Inn to the black moonlit landscape outside. As you sup your ale, however, you cannot help noticing how quiet it is in the taproom. It is obvious from your appearance that you would have an interesting story to tell, but the locals just sit in silence staring morosely into their mugs. You will have to buy one of them a drink to get them talking (ONE OF THE HEROES MUST NOW SPEND ONE GOLD COIN TO GET AN OLD FELLA TO TALK TO THEM).
'It's the poor Milkmaid, you see, Perdita. She's been spirited away and there's no doubt she'll have been taken to the old Manse that lies far out on the moor, over the Lich-way. It was once the home of Grim Dugald, as black-hearted a devil as ever wore a man's face, and since his death 30 years ago not a soul has been there and come back to tell of it. Ordinarily, we would ban together and go out to look for her, but this is Samhain Eve, and no-one will go abroad on the moor with all the wild witchery that will be afoot!'
You have been at a loss as to what to do with yourselves after saving the world, but you now have your Quest - go out over the moor to the Manse of Grim Dugald and rescue Perdita the Milkmaid."Notes - This Quest is for all four Heroes. If one or more of the Heroes didn't survive the previous Quest, make a new starting Hero of that type available now. This adventure is split into two parts; health and spells are NOT recovered between this Quest and the second part (Quest 11).
Quest 10 takes place on a foggy moorland on the haunted night of Samhain Eve. All of the Zombies in this Quest are known as Barrow Dwellers. These undead creatures are supernaturally imbued with power during Samhain, and have the following stats - Move 4, Attack 3, Defend 3, Body 2, Mind 0.
A - This is the taproom of the Knocklor Inn where the Heroes start, before taking the Lichway.
B - This is a pedlar with a hand-cart. He looks scared half-to-death and is keen to get into the Inn, but will stop briefly to sell any of the following wares to the Heroes;
Rope 25 gold,
Lantern 30 gold,
Mongoose Statue 50 gold,
Sprig of Garlic 15 gold,
Wooden Stake 15 gold,
Holy Water 50 gold,
Silver Dagger 200 gold,
Healing Potion 150 gold (will restore 4BP).
C - This skeleton is the corpse of some criminal, which now hangs by the roadside in an iron gibbet. It seems to be grinning at the Heroes as they pass, but will not attack.
D - As the Heroes approach this intersection, tell them that the fog has grown unusually thick. The first two Heroes to pass through the D get disorientated and must move south. The next two Heroes must move north. The Heroes have now been separated into 2 groups and can only reconvene by following their allotted routes. There is no way they can get around this or return back past the D symbol, even with spells such as
pass through rock (remember, the Heroes are in foggy open moorland, not a regular dungeon).
E - These stone doorways lead into long-barrows, ancient tombs carved into the side of the granite tors along the Lich-way. These stone doorways are opened using the normal rules for these doors, but they don't fall back into place; once opened, they should be replaced with normal open doors. The corridors inside a long-barrow are extremely narrow; figures may not pass through others whilst they are inside.
F - The Heroes encounter a pack of three headless hounds, undead creatures which bray hideously from gaping holes in their necks. Stats - Move 9, Attack 4, Defend 2, Body 1, Mind 0.
G - The first Hero to search the tomb for treasure finds the artefact
Cursed Sword. He must take that artefact card. The only way to beat this curse is for the Hero to survive Samhain Eve; if he can survive until the end of Quest 11, the magic of the Cursed Sword will end, and it will become an ordinary short sword.
H - The chest in this long-barrow contains 100 gold coins and a
Genie in a Bottle (same as a spell scroll for the Genie spell).
I - Use the quicksand tile from Mage of the Mirror here, representing a large bog. A small magical creature known as a Spriggan sits by a campfire (X). The Heroes get the odd feeling that all of the fog is coming out of the Spriggan's fire. On entering the room, or even standing outside the door, a magical fugue immediately descends on the Hero; he must sit down by the Spriggan. He can do nothing at all until he breaks out of the fugue; at the start of each of his subsequent turns he must roll the same number of combat dice as he has Mind Points to see what happens;
0 skull = at the Spriggan's command, the Hero moves out into the bog and begins to sink in the quicksand. He will lose 1 Body Point on each of his turns, until he is saved by another Hero (or else sinks in the mire and dies).
1 skull = The Hero remains in his stupor for now.
2 or more skulls = the Hero breaks out of the fugue and grabs the Spriggan by its hair. It wriggles and bites, but ultimately has to obey the Hero. It will not only guide the Hero safely across the quicksand to the other side, but will also help pull out any Hero already sinking in the quicksand. Once on the other side and the Hero/Heroes are safe, the Spriggan will run off into the fog (take it off the board).
J - Use the battle tile from Against the Ogre Horde here, representing the courtyard of a ruined castle. Two ghost knights stand upon the X's, duelling with each other. They are the ghosts of Sir Oben & Sir Herab, who were defeated by the Witch Lord centuries ago, and they have been fighting each other ever since, each still blaming the other for not supporting their attack. They will never leave this room, but will however team up to fight any intruders - Move 4, Attack 4, Defend 4, Body N/A, Mind 1. They cannot be killed conventionally. Instead of attacking, a Hero may attempt to convince the ghosts that they are dead, and to stop fighting; the Hero rolls 2 red dice and if he rolls the same as or lower than his Mind Point total, the ghosts depart for ever. The Heroes may leave the room through any of the 3 doors at any time, but cannot search it until the ghosts have departed.
K - There is a suit of
Plate Armour on the weapon rack.
L - The Heroes have almost reached the Manse of Grim Dugald. There is a deep moat with an unusual bridge spanning over to the gatehouse; thick squares of slippery, polished marble hover magically in the air without support. Each time a Hero wishes to move from one stepping stone to the next he must roll a combat die; if he rolls a white shield he loses his footing, falls, and hangs on by his fingertips to the square he just tried to move from, losing 1 Body Point in the process. Once a Hero is hanging, he can only be pulled back up by another Hero standing on an adjacent or diagonally adjacent square (using one action). On each of his turns when a Hero is hanging but is not rescued, that Hero loses another Body Point due to the strain of trying to hang on.
M - Tell the Heroes that this 'room' is a descent into a dry moat surrounding the Manse of Grim Dugald. The outer wall of the Manse rises up where the north wall of the room is; the secret door is an old sally port in this wall - it can be found by searching, but cannot be opened from this side, unless the Dwarf is present or a
Genie spell is used (It can be opened as normal from the other side, and the wall may also be traversed using
pass though rock. The X' represent four Banshees, undead spirits with the following stats - Move 6, Attack 3, Defend 3, Body 2, Mind 0. They also 'scream' continuously throughout the battle - before a Hero takes a turn he must roll 1 red die and roll less than his Mind Points, or can do nothing that turn (they may still defend as normal). Holy Water will destroy a Banshee.
N - These stone steps lead up to the Manse of Grim Dugald. Proceed to part II (Quest 11).
Wandering monster - Zombie (Barrow Dweller)
 Quest 11 - In the Night Season.
Part II, The Manse of Grim Dugald
The Heroes' Tale (continued)..."At last you have arrived at the deserted Manse of the infamous Grim Dugald. It seems you have already had as harrowing a night as any you can remember in crossing the bleak moor; but your perils are far from over yet. You look at the darkened Manse with it's high gables, gaping window-sockets and shroud of ivy - and the feeling of foreboding makes you shudder to your core.
Still, you will not make thing's any better by hanging around out here; you may as well get things over with. If only you knew what the 'things' in question were..."Notes - This Quest is for all Heroes that survived the previous Quest. Health and spells are not recovered before part II. The adventure is completed if the Heroes manage to rescue Perdita the Milkmaid, and then leave the Manse via the same way that they entered.
A - Use two of the small stair tiles from
Kellar's Keep here, to represent a double-wide staircase. Tell the player that paintings of the Dugald ancestors line the walls, and the staircase itself looks very old and dangerous. Whenever a Hero enters one of the stair squares he must roll one combat die; on a black shield he loses one Body Point as the masonry crumbles underfoot.
B - This is a writing desk. If a player searches it for treasure he will find the "journal of Dugald of Knocklor". There is one entry made every year in the journal, always dated to Samhain Eve (this very night), and it records decades of acts of shuddering depravity. Strangely, all of the entries dated from 30 years up to the present are written backwards as if seen by a mirror, whereas the journal dates before 30 years ago are written normally.
C - Use the
mirror from Mage of the Mirror here, showing the black side. If the
Scrying Glass is used here, say that the mirror appears to be full of extremely malicious magical energy. If a Hero searches the mirror, the face of a demon will materialise in the glass. The Demon will then squint at the Hero and say "You aren't my Master. No Luck for you today". The Hero is then instantly teleported to room D. The only way to rescue Heroes trapped in room D is to hold the portrait of Grim Dugald (from room E) in front of the mirror. This will fool the demon into thinking that its Master is present, and he will return any Hero or Heroes previously teleported to room D. In addition, the fooled demon will grant
one of the following requests; i) replenish all spells to everyone in the room, or ii) restore all Heroes in the room to full health.
D - This room is actually a prison cube in a parallel dimension. There is no escape from the cube, other than the Hero's companions managing to summon him back from this dimension (see note C). However, if the Hero searches for treasure whilst he is waiting to be rescued, he will find the magic artefact
Wraithweaver.
E - There are many more paintings of Dugald ancestors hanging on the walls. If a Hero searches the fireplace they will find a hideous framed portrait of Grim Dugald himself. Tell the Hero that he can take the painting if he wishes (record it as an item on his Character sheet).
F - This spiral staircase leads down to door that will open up to the basement level of the Manse.
G - This is a wine cellar. If a Hero drinks the wine he will get drunk and lose 1 attack and defence die for the rest of the quest (minimum of 1 die).
H - Use the Coast tile here; it represents an underground lake in a large cavern beneath the Manse. Place a trapdoor tile on the other side of the lake, representing a small pier jutting out over the water. The Heroes should take the boat across as a group (they can all fit inside). When they reach the pier, they will be attacked by Giant Bats; everyone in the boat is attacked once with 3 combat dice, before the bats depart. The boat will then slowly sink - everyone can disembark safely before it does so, but the group will not be able to return the same way.
I - This door is locked and can only be opened with a bronze key.
J - This is a shrine holding a huge vat of blood. If it is searched for treasure the Heroes will find a bronze key, but as soon as it is picked up both doors labelled K are opened and the inhabitants activated. The Heroes should also be given a chance to 'purify' the shrine - they can place any items in the blood, (Holy Water, Garlic etc) but don't tell them yet if the treatment has been successful or not.
K - Theses are 'Undead Brides', with the following stats - Move 6, Attack 4, Defend 4, Body 2, Mind 0. They are 'almost' Vampires; the sword
Wraithweaver will be affective against them, but garlic, Holy Water and Silver Daggers will not.
L - This is Perdita, the Milkmaid. She says she was taken by Dugald whilst walking on the moors. She will now accompany the Heroes as they attempt to escape the Manse (use the Millandriel tile from
Mage of the Mirror). Monsters will not attack her, preferring to attack the Heroes instead.
M - This is Grim Dugald, a vampire - Move 9, Attack 5, Defend 5, Body 10, Mind 5. If the vat of blood (J) was purified with garlic and/or holy water, then Dugald will have been weakened and starts the battle with 5 Body Points instead of 10. These items will have no effect on Dugald if they are used directly on him, however. If Dugald is slain, on Morcar's next turn tell the Heroes that he shows signs of regenerating back to life! He must be finished off with either a
Silver Dagger or
Wraithweaver through the heart (Dugald cannot defend whilst he is regenerating), or he will return to life with 5 Body Points on Morcar's following turn. This horrific process will continue until Dugald is finished off with either a
Silver Dagger or
Wraithweaver .
N - This secret door can only be found from this side. Once opened, the bookcase on the other side of the wall will slide up one space, allowing passage.
0 - There is a poison needle trap on the chest, which causes 2 Body Points of damage if the Hero does not first search for traps. It contains 1000 gold coins. If Perdita is with the Hero group she will caution them to only take half the gold, as taking any more will bring down a curse. If her advice is not heeded, the entire contents of the chest turn to leaves on leaving the Manse.
Wandering monster - Tell the Hero that they get the feeling that they are being watched from the walls, but can see no monster.


 s, was successful at killing the first one. The other one attacked, she blocked,but failed to roll a
 on her next attack. The
 tried jumping it but rolled
 . The Mummy came to and flopped on his attack. She rolled a
 taking 1 damage. The Mummy then attacked for 2



 . He broke her Rock Skin on the first hit. She finally stabbed him once and then tried Fire of Wrath to finish him off but I rolled
 . My next 2 attacks killed the
 did 2 more damage before she killed it after 4 turns. Upon leaving she failed to jump the Falling block trap and therefore had to use Pass through Rock to get out... but she went North, through the Avoid section, completely forgetting the "Avoid" part. She went up to the room with the 2
 s. She mistook the words "it will take them an extra turn to react to the Hero's presence", as them not noticing her. So she took the opportunity to run away and she went to the room with the Choas Warrior. Although Ball of Flame did deal 2 damage, the
 attacked with