• Advertisement

Make a small donation to Ye Olde Inn!

Donate via Paypal

Every cent received goes toward Ye Olde Inn's maintenance and allows us to continue providing the best resources for HeroQuest and Fantasy Gaming fans.

[Quest Pack] [14 Quests] - WAAAGH!!!

Discuss Quest creation and share Quests/Quest Packs you've created.

[Quest Pack] [14 Quests] - WAAAGH!!!

Postby Thrawn » March 16th, 2012, 1:04 am

Edit-6/19/2017 - This is the full pdf. https://drive.google.com/file/d/0ByTZlogh9hxKdmxJNDlLWGtrV28/view?usp=sharing
The PDF has more up to date versions than the preview quests below.

Edit 2012 Personal note: I personally have run through the entire set of officially released quests twice as Zargon, in addition to numerous custom quests and campaigns. After over a decade away from the game, I'm preparing to show another group through Hero quest. I'm deciding between rewriting all of the "official" quests, or running a different set of quests for the beginning adventurers, a campaign I've had sitting in excel spreadsheets for 10 years called "WAAAGH!" This campaign was meant to be an alternative to the boxed set quests. The plotline is a little easier to follow (because it's one larger plot), and I believe the advancement is at a slightly decelerated pace. (I always found the heroes to be capped out by quest 14, and most heroes well before that... around quest 8) Unlike the orginal set of 14, I stopped at 12, simply because that is all I thought the plotline needed to be complete.

EDIT 2012: I expanded to 14 during playtesting, expanding Night Goblin Portion to 2 quests, and separating the search for Orc Bane into it's own quest building up to the finale.

I'm going to keep a running set of additional monsters and rules that were not included in the original set. As I convert quests for this thread, I'll bring the rules and monsters up to this first post. I do have several other optional rules I plan on using as I play through, but I am only including the ones here that I think are relevent to the quests. (I can talk about the other rules in here or elsewhere. A bunch are ones I'm stealing and modifying that I found from others on this site.)

Furniture and tiles. I used a lot of custom furniture and tiles in these quests when I originally ran them (because I could). I've tried to cut back on tiles and furniture to fit the base game except where I felt a custom piece was key to the quest. I also used a lot of other monsters, and have retained some as I convert quests, but am cutting out many that I don't feel are important.

New Rules:

Wandering monsters -To add greater variety to wandering monsters, on each quest, 3 different selections will be given. Each time a wandering monster is needed, roll a single skull die. On a skull, select the "common" monster or monsters. On a white shield, instead select the "uncommon" monsters, while a black shield indicates "rare" monsters.

New Monsters:

I used a large number of custom monsters throughout this campaign. I did this because it was designed to be challenging for a set of beginning heroes, but at the same time was to be played by experienced players who already had seen everything that there was to offer in the published game system. If felt it was good to keep things fresh using new creatures and challenges. However, I did try to do two things. First, the simplicity of heroquest is it's greatest asset, so I tried to make sure any new creatures and special rules could be resolved quickly and easily, and kept the basic flavor of the game. I also realise that not everyone plays warhammer 40k or other miniature based games, so I try to offer alternatives for custom creatures.

Goblin Archer - Stats equal to a goblin. May attack ranged. If attacking adjacent, only allow a single attack die (Used starting quest 1)
Goblin Spearman - Stats equal to a goblin. May attack diagonal. (Used starting quest 1)
Note: For goblin archers and spearmen, just use standard goblings if you don't have the miniatures to cover these units. It simplifies things at the cost of some tactical diversity.
Orc Big'un - Mv 7, A 4, D 3, B 2, M 2 (Basically it's a big orc, that works as a replacement between Fimir and Chaos Warrior stats. Used starting quest 3.)
Note: An orc big'un could easily be replaced with a fimir or a chaos warrior if you don't have appropriate miniatures or for some reason want to stick with original published monsters. I feel the orc big'un is superior from a theming perspective. (It also gave me the ability to use my miniatures from the Warhammer Quest supplement "Lair of the Orc Warlord".)

Skeleton Archer - Stats equal to a skeleton. May attack ranged. If attacking adjacent, only allow a single attack die. (Used starting quest 4)
Mummy - As per normal stats, but add special rule. Special Rule: Cause Disease - If a mummy inflicts a wound on a hero, they are at -1 attack and -2 move until they are healed back to full wounds. Multiple infections of disease are not cumulative.(Used starting quest 4)
Wight - Mv 6, A 3, D 3, B 2, M 0, undead. Special Rule: Deathblow - After a hero roles defense against a wight's attack, all unsaved wounds will inflict 2 wounds instead of 1. (Used starting quest 4)
Note: Skeleton archers could be replaced by skeletons if needed, mummies could be used without the special rule addition, and wights could be replaced with zombies, mummies, or perhaps skeletons with extra stats if you lack miniatures or want to stick to base creatures.


Night Goblin - Same as goblin. (Used starting quest 5)
Night Goblin Archer - Same as goblin archer (Used starting quest 5)
Squig Hound - Mv 10, A 4, D 1, B 1, M 1 (Used starting quest 5)
Goblin Fanatic - Mv d6, A d6, D 1, B 1, M 1 Movement is variable and rerolled on each of Zargon's turns. The fanatic must move it's full movement each turn in a single direction ignoring models as it goes. It attacks every model (even allies) it passes through on it's turn, using d6 combat dice! (Roll d6 to see how many dice each time it attacks a new model.) If the fanatic hits furniture or a wall during it's movement, it automatically is killed. (Used starting quest 5)
Night goblins and night goblin archers are easy to replace with goblins. Squig hounds are a little more difficult, but perhaps a fimir would pose a similar challenge. Squigs are all offense, and there isn't really an equivalent. Fanatics are even more dangerous, and are the most complicated creature I have used in any of my quests. (I don't like that he's so complicated, but I find him fun, and he's definitely scary.)

Gargoyle - As per normal stats, but add special rule. Special Rule: Flight - Flying creatures may move over furniture and enemy models during their movement, but must end their turn in open squares.
Note: Small change to gargoyles to make them more interesting. Optional, kind of like the mummy change.


Giant Spider - Mv 8, A 1, D 1, B 1, M 0, Special Rule: Poison - Any unsaved wound caused by this attack puts a poison counter on the hero in addition to causing damage. Any hero poisoned must roll a combat die at the beginning of their turn. On a black skull, the hero takes one body point of damage, which can't be defended. Poison is cured by any potion or spell that specifically was created to counter poison damage. (Used starting quest 9)
Wyvern - Mv 8, A 5/3, D 4, B 6, M 2,
Special Rules:
Flight - Flying creatures may move over furniture and enemy models during their movement, but must end their turn in open squares.
Poison - Any unsaved wound caused by this attack puts a poison counter on the hero in addition to causing damage. Any hero poisoned must roll a combat die at the beginning of their turn. On a black skull, the hero takes one body point of damage, which can't be defended. Poison is cured by any potion or spell that specifically was created to counter poison damage. (Not poison only is active on the wyvern's 3 die tail attack, not it's 5 die bite attack.
(Used starting quest 9)
Note: Spiders and Wyverns were both custom creatures added. If necessary, switch spiders for goblins. However, the Wyvern is pretty integral to the game.

Troll - Mv 6, A 4, D 3, B 4, M 1,
Special Rules:
Regeneration- When injured, but still above 0 body point, a regenerating creature roles 1 combat die for each missing body point at the beginning of their turn. For each shield (white or black) the creature regains 1 body point.
(Used starting quest 10)
[quote]Note: Trolls could be replaced by ogres if needed, although ogres hit harder, so be careful on balance.[quote]

[Additional components neededi: 1 Chaos Champion, 9 Giant Spiders, +3 Goblins, 6 Goblin Archers, 2 Goblin Fanatics, 1 Goblin Leader, 5 Goblin Spearmen, Mercenaries: 3 Crossbowmen, 3 Halberdiers, 1 Scout, 5 Swordsmen, 7 Night Goblins, 4 Night Goblin Archers, 1 Night Goblin Shaman, 1 Ogre Warrior, 4 Orc Archers, 3 Orc Big'uns, 2 Orc Shamans, 1 Orc Warboss, 4 Skeleton Archers, 3 Squig Hounds, 2 Townspeople, 5 Trolls, 3 Wights, 3 Wolves, 1 Wyvern, +4 Zombies
Cage Room Tile (from Frozen Horror), Carpeted Room Tile (from Against the Ogre Horde), Causeway Tile, 2 Cliff Corridor Tiles (from Keller's Keep), 3 Coffin Tiles (from Return of the Witch Lord), Circle of Power Tile (from Marvel Winter Special), Door of Flame Tile (from MWS), 1 Iron Entrance and 2 Wooden Exit Doors (from KK, Mage of the Mirror, or RotWL), +4 Open Doors, Pit of Chaos Tile (from AtOH), 2 Portcullises (from MotM), 1-3 Rock Lobbers or +0-2 Torture Racks, 4 short and 4 long Stairway Tiles (from KK), 1 Stone Door (from AtOH), Surface Tile (from AtOH), Throne Room Tile (from RotWL), 2 Trap Door Tiles (from KK or MotM), Waterfall Walkway Tile (from Ye Olde Inn), 2 Wall of Death Tiles (from MWS), Winding Path Tile
Artifact Cards: 2 Magical Throwing Daggers (from KK or RotWL), Spell Scrolls--Ball of Flame, Courage, Fire of Wrath (from KK or RotWL), Treasure Without Doom (from MotM), x2 Spell Rings (From NA Main Game System), Wizard's Cloak (from NA MGS)
Orc Shaman and Necromancer Spell Cards (from WoM)

These Quests are suitable for a new group of Heroes with starting equipment.-edit]
Last edited by Daedalus on August 31st, 2017, 4:54 pm, edited 24 times in total.
Reason: Formatting and links added


Rewards:
Created a Hot Topic.
Thrawn

Ogre Chieftain
Ogre Chieftain
 
Posts: 212
Joined: February 9th, 2012, 1:39 am
Location: Bartlett, TN, USA
Forum Language: English (United States)
Hero:
Evil Sorcerer: Zargon
Usergroups:
Adventurers' Guild Group Member Champion Group Member

Advertisement

Make a small donation to Ye Olde Inn!

Donate via Paypal

Every cent received goes toward Ye Olde Inn's maintenance and allows us to continue providing the best resources for HeroQuest and Fantasy Gaming fans.

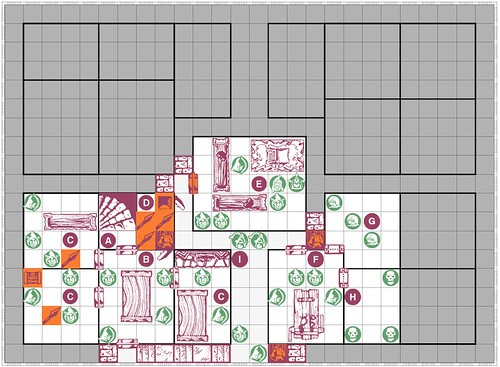
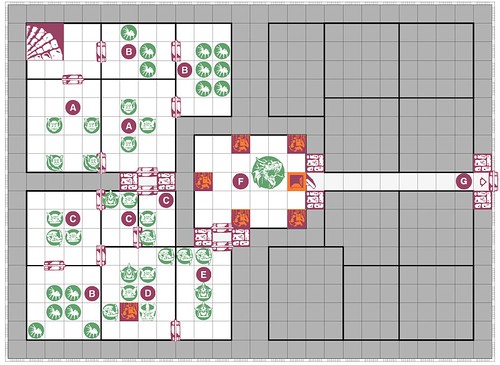
WAAAGH! Quest 01 - Skull River Raiders

Postby Thrawn » March 16th, 2012, 1:05 am

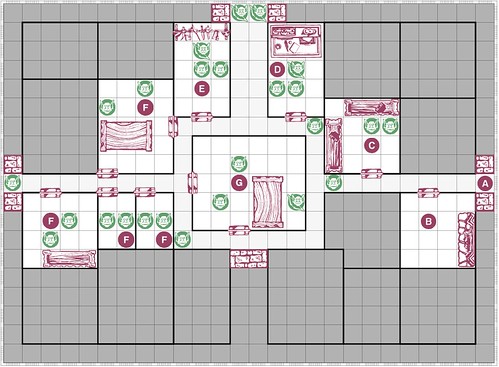
"Smoke rises on the horizon as the heroes approach the village. As they get closer, they can clearly see that a number of buildings are on fire, and the clash of battle can still be heard coming from the streets and homes. Quick action will be needed if this attack is to be haulted! All of the raiders in the village must be defeated. Don't allow them to escape and warn others."

Image

A The heroes enter the village from this square. The city streets are clear except a loan goblin looting the body of a villager. Smoke rises from buildings on both sides of the street.

B This looks like someone's home. The furniture has been upturned and broken, and it has been thoroughly looted. If searched for treasure it is empty.

C This building is the village records office. The goblins here are in the middle of ransacking it looking for anything of value.

D This is the village apothecary's shop. Goblins are breaking bottles and spilling things at an alarming rate. If searched for treasure, the apothecary's table still has one healing potion that is unbroken. It will restore up to 4 body points when used.

E This looks like it was once the city armory, although the weapon racks are now empty. The goblins don't seemed convinced there isn't anything more.

F This looks to be someone's home. Goblins are happily tearing it apart.

G This looks like the village watering hole. Goblins are happily guzzling everything they can find from the stores. If the room is searched for treasure, one of the goblins has an alcohol soaked parchment with a crude map leading a location accross the Skull River marked with a skull. Several "X" marks show the locations of recently raided villages.

Wandering Monsters:
Common: A surviving villager pops out of nowhere and quickly flees the scene.
Uncommon: Goblin
Rare: Goblin Archer

Quest End: Once the goblings are defeated, the villagers have lost everything and are unable to offer reward other than a dinged up helmet that survived the battle. See the armory entry or equipment card for the description of this item.

Personal Notes: This is far less dangerous than "The Trial" from the original campaign as a first quest. It also uses a much smaller range of creatures and furniture. I always disliked the trial because it basically introduced too much too fast, making the quests that come after seem small in comparison. I did keep one idea from that quest though, and that is not using traps in the first quest. I chose a setting where not having traps makes a lot of sense as well, since it isn't a dungeon environment. This quest does provide a tactical challenge that isn't included in the trial however. Ranged troops are introduced right from the start, although only in limited encounters.
Last edited by Thrawn on March 17th, 2012, 1:19 am, edited 9 times in total.


Rewards:
Created a Hot Topic.
Thrawn

Ogre Chieftain
Ogre Chieftain
 
Posts: 212
Joined: February 9th, 2012, 1:39 am
Location: Bartlett, TN, USA
Forum Language: English (United States)
Hero:
Evil Sorcerer: Zargon
Usergroups:
Adventurers' Guild Group Member Champion Group Member

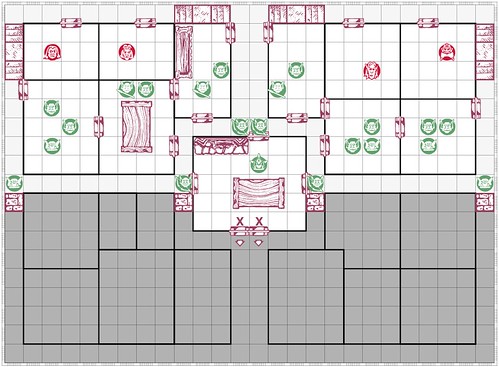
WAAAGH! Quest 02 - Yellow Eyes of Skull River

Postby Thrawn » March 16th, 2012, 1:08 am

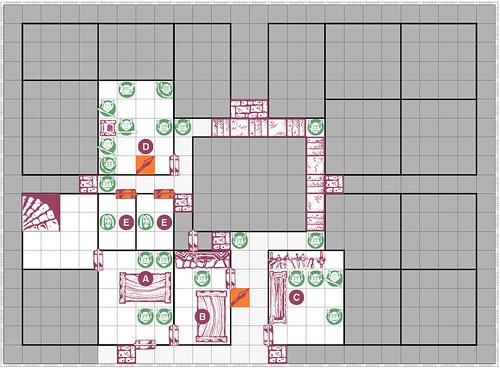
"Following the crude map found on the goblin raiding party, you have found your way to a hidden encampment on the western shore of the skull river. Members of the Yellow Eye goblin tribe have inhabited a cave, using it as a staging area for the raids on the surrounding villages as well as the caravans and traders trying to move up and down the South Road. A quick strike could catch the goblins by surprise, and hopefully drive them from the region. They are likely to have treasure from all of their raids, but are just as likely to have set up deadly traps to guard it."

Image

A "This room is a dirty feasting hall. As you enter the goblins are tearing at a mix of undercooked and charred meat spread accross the table."

If searched for treasure, 2 usable daggers can be found on the table.

B "This room is a kitchen, and the goblin wears a hat an apron. This doesn't stop him from charging with his cleaver."

C "This room is the barracks of the goblins. As the heroes enter the door, goblins scramble from piles of straw to arm themselves."

As the goblin's keep their belongings in the cabinet and weapon rack, the first hero to search for treasure should draw three! treasure cards instead of one. All three should be resolved simultaneously whether they are added wealth, wandering monsters, or hazards.

D As the heroes enter, an orc is arguing with what looks to be the goblin's leader. Other goblins are gathered around watching the spat, but quickly turn their attention when the door swings open. The goblin leader barks out orders to attack while the orc readies a nasty looking weapon.

The goblin in front of the throne is the goblin boss. He has the stats of a normal goblin, except he has 2 body points instead of 1.

If searched for treasure, the goblin boss has a key on him (needed to unlock the prisoners in area E) along with 30 gold. The orc hold's a crudely written message from a "Warboss Gorefist" with orders for the goblins to join an attack on a nearby dwarven called Barak Varr which lies downriver.

E These two cells contain townspeople kidnapped by the goblins during their raids. These towns people have 5 move, 1 defense, and 2 body, and are unable to attack. If they are escorted out of the dungeon safely, rewards of 50 gold will be paid for each of them by their happy families.

The porticulis doors to the cells are trapped with arrow traps. Anyone trying to open the doors before searching for traps and disarming them will take 1 body point of damage. Even after disarming the doors, they are locked and can only be opened using the key from room D.


Wandering Monsters:Common: Goblin
Uncommon: Goblin Spearman
Rare: Goblin Archer

Quest End: For defeating the goblins, and removing the threat to the villages, townspeople manage to pool together 50 gold as a reward.

Personal Notes:
As my replacement set of quests, I gave a nod to the Ragnar Quest by including a rescue in the quest, although it wasn't the stated goal of the quest. The treasure is slightly lower than the Ragnar quest overall, but there is still enough to pick up another shield or helm if the heroes pool their resources. (When I ran the original quests two times, I found that by the end of quest two, we were looking at 3 helms and a shield in the party at the end of quest 2, which made things less challenging for a bit.)

As an additional note, I did use two staircases from Kellar's Keep in this quest. Although I like them from a decoration and design standpoint, they are not necessary for the quest, so for anyone without access to the stair tiles, the long stairways can simply become long halls.
Last edited by Thrawn on March 17th, 2012, 9:43 pm, edited 6 times in total.


Rewards:
Created a Hot Topic.
Thrawn

Ogre Chieftain
Ogre Chieftain
 
Posts: 212
Joined: February 9th, 2012, 1:39 am
Location: Bartlett, TN, USA
Forum Language: English (United States)
Hero:
Evil Sorcerer: Zargon
Usergroups:
Adventurers' Guild Group Member Champion Group Member

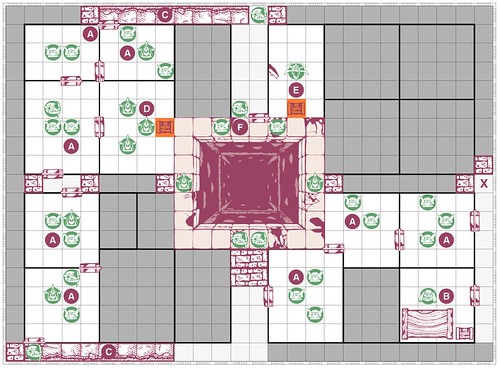
WAAAGH! Quest 03 - The Bridge to Barak Varr

Postby Thrawn » March 16th, 2012, 1:10 am

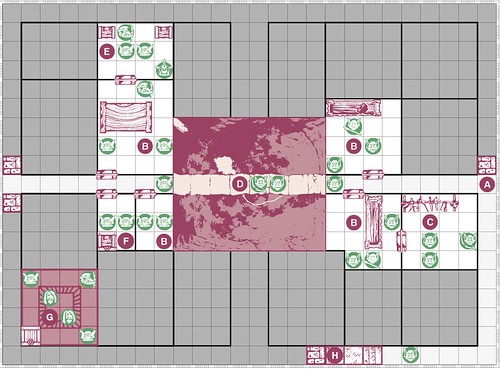
"The forces of Warboss Gorefist have fortified the major river crossing to Barak Varr, a dwarven stronghold at the base of the Varenka Hills. This dwarven fortification sits at the crossroads of major trade routes as well as the borders of several orc and goblin tribes. Should the dwarven fortress fall, the Orc tribes would be able to unite and start a march northward towards the empire. If any aid is to reach the dwarves, the Skull River Crossing must be taken back from the vile orcs."

Image

A - The heroes enter the map here following the road. Ahead lies a bridge accross the skull river, with lightly fortified buildings at each end.

B - This room doubles as a store room and barrack. The creatures inside seem to be ready for your attack.

C - If searched for treasure, the weapons rack contains a staff. See the armory or equipment card for details on this item.

D - This bridge crosses a raging river. If the heroes enter the bridge without first clearing the buildings to the east of the river, the doors swing open as the alarm sounds.
In addition, anyone who takes 1 or more bodypoints of damage while on the bridge must check to see if they fall into the river. Roll a single skull die. On a black skull, they have fallen off the bridge into the water, and will wash up at point H on their next turn. (See H for more details.) If anything other than a black skull is rolled, nothing happens.

E - Among the orcs in this room is a rather large orc called an Orc Big'un. This orc has higher statistics than a normal orc, being meaner and tougher.

If searched, this room holds 60 gold split between the two chests.

F - The chest in this room is empty, and any searches for treasure in this room will be fruitless. However, upon searching for secret doors, the hero will find that the chest slides to the side (to the square marked F), revealing a trapdoor. The trapdoor leads to room G.

G - This underground cell holds two captives from merchant caravans trying to get supplies to Barak Varr. Once all the orcs in the room are killed, they can be released, and they will gladly relay information they have heard while held captive.
1. An Orc Warlord called Badlum Gorefist is trying to unite the Orcs and Goblins of the area into an invasion force.
2. He has recently located an artifact called the Black Axe of the Blood River. Half the guards from this bridge were sent to a tomb near the Blood River to recover it. They have only half a day's lead on the heroes.
3. He is "courting" the Bloody Spear Night Goblin Tribe to the north, and expects them to join his legions soon.
4. He is seeking a mount he feels is worthy of him as he leads his invasion.

H - These stairs lead up from the river at a point downriver from the bridge. Any hero falling off the bridge will wash up here. (Monsters will simply drown.) However, the river is fierce, and in addition to taking 1 body point of damage, to keep afloat the hero has to cast off their possessions. Remove all equipment and treasure from the hero's inventory including weapons, armor, potions, and gold. The hero will attack with 1 attack die while weaponless, and will defend with 2 defense dice.

Quest End - Breaking the blockade on their city, the dwarves give the heroes 100 gold as a reward, and promise help in the future.

Wandering Monsters
Common: Goblin
Uncommon: Goblin Archer
Rare: Orc

Personal Notes:
This quest was originally set up like two gate houses on opposite sides of a raging river. I have a river tile I made in photoshop that was structured like the "Center Walkway" tile I found for expansions in Hero Scribe. I agonized over whether I should redesign to not use it, but in the end, I really like the center walkway build for this layout. I wish I still had the photoshop files along with my excel files for the quest designs, but they didn't get passed from computer to computer over the years. (I went a long time without any photoshop.) If there is backlash at using a custom tile, I could make the slight change to curve the "bridge" around one of the two sides of the center room. (This can also be left to those Zargons/Morcars out there without an appropriate custom tile.) If at the end of this we are putting this together into a pdf quest pack, I may even rebuild my custom tile to include in the pack.

I was going to post this quest without the washing ashore and falling off the bridge rules, but I decided I like them too much and have left them in.
Last edited by Thrawn on March 27th, 2012, 11:14 pm, edited 10 times in total.


Rewards:
Created a Hot Topic.
Thrawn

Ogre Chieftain
Ogre Chieftain
 
Posts: 212
Joined: February 9th, 2012, 1:39 am
Location: Bartlett, TN, USA
Forum Language: English (United States)
Hero:
Evil Sorcerer: Zargon
Usergroups:
Adventurers' Guild Group Member Champion Group Member

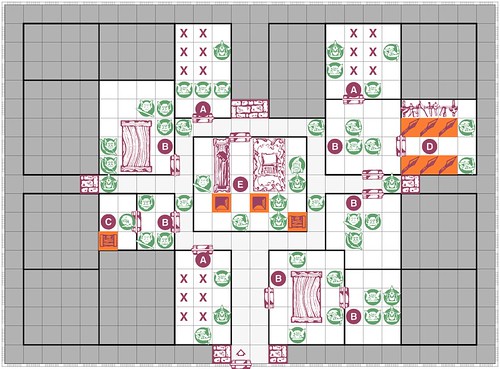
WAAAGH! Quest 04 - The Black Axe of Blood River

Postby Thrawn » March 16th, 2012, 1:12 am

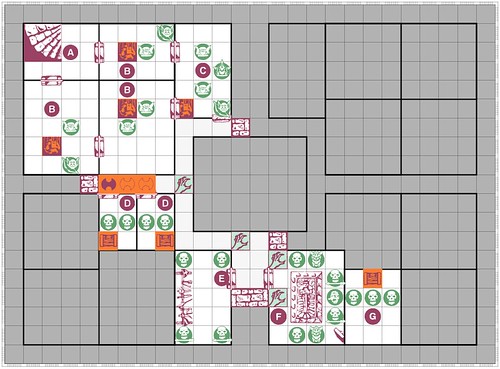
"You have tracked the Gorefist's orc and goblin explorers to an ancient tomb of a champion of the god Khorne who once brought war to the dwarven holds in the area. Although the name of this champion is lost in the mists of time, it is clear that Gorefist believes this tomb holds his axe, an artifact of pure evil that could make a powerful addition to the planned orcish invasion. You must stop the orcs from recovering this artifact."

Image


A - "As you descend the staircase, you can see the crushed bodies of several goblins half buried under rubble from the unstable ceiling collapsing upon them."

B - The Orcs and goblins in this room seem to keep one eye on the ceiling, even as they prepare to receive your charge.

C - The orc farthest from the doors is an orc big'un. See the special profile for this creature type.

If searched for treasure, the orc big'un has 35 gold on him, in addition to what looks like a piece of an ancient dwarven tablet. It reads "Only from within shall the crypt of Mordain be opened."

The stone door is covered in ancient warding runes. It looks like the orcs have tried hacking through, and have made some cracks in the surface. If attacked, the stone door has 4 defense dice, has 2 body points remaining, and defends on a black skull. In addition, if a black skull is rolled, the weapon used to attack is destroyed in the attack. If someone decides to pass through stone and open from the other side of the door, it opens easily.

D - The skeletons lying in this room seem to spring to life as the door is opened. The chests in this room is trapped with a fire trap, doing 3 attack dice of damage to everyone in the room with no defense allowed if treasure is searched for without disarming the trap. The chest has 30 gold.

E - The skeletons lying in this room seem to spring to life as the door is opened. If the room is searched for treasure, a rusted but usable broadsword is found on the weapon rack.

F - This room is the tomb of the Chaos Champion Mordain. As the heroes ente, the skeletons and wights come to life, and a mummy slowly crawls out of the sarcophagus.

If searched for treasure, the sarcophagus contains a large two handed axe. Any hero trying to wield the axe must immediately roll a d6 for each mind point they have. If a 6 is rolled on any die, they can attack as normal, and the axe does 5 combat dice of damage and can't be used with a shield. If no 6's are rolled, the hero is controlled by Zargon for the round (and will likely attack a hero) as if under a domination spell, and loses 1 mind point for the rest of the quest. At the end of the round the hero can voluntarily stop trying to use the axe. Note that a hero can actually carry the axe with them without harm as long as they don't try to wield it.

G - The skeletons lying in this room seem to spring to life as the door is opened. The chests in this room is trapped with a fire trap, doing 3 attack dice of damage to everyone in the room with no defense allowed if treasure is searched for without disarming the trap. The chest has jewels worth 65 gold.

Wandering Monsters
This quest has a special rule for wandering monsters. All wandering monsters enter from the stairway, instead of popping up and ambushing the heroes. They can move to engage the heroes right away, or they can wait in ambush for when the heroes try to make their escape.
Common: Goblin Archer
Uncommon: Orc
Rare: Orc Big'un

Quest End - The quest is completed when the heroes successfully escape to the stairway with the black axe.

Personal Notes: This quest involves a number of challenges, and is meant to be a little bit of a change from previous quests (especially as the first to use undead.) The first "half" of the quest involves fighting off the orcish explorers in the caves outside the crypt, while dodging falling rocks. The door itself poses a challenge as it can cause great harm with potential broken weapons if they don't think to use pass through stone to open from the inside. (The broadsword is to help out those who break weapons on the stone door or who lost their equipment in the previous quest falling off the bridge.) Don't underestimate the wights and mummy. They are dangerous with their special rules. Wandering monster orcs can become a big problem either waiting in ambush at the stairs, or piling in from behind while the heroes fight off the undead (and the hoarde can become bigger the more the heroes look for treasure). This becomes a very dangerous quest with these elements combined. The axe itself is powerful, but not meant for use. (Hopefully that becomes obvious to the heroes.) It will come into play more later in the quest.
Last edited by Thrawn on March 17th, 2012, 9:48 pm, edited 5 times in total.


Rewards:
Created a Hot Topic.
Thrawn

Ogre Chieftain
Ogre Chieftain
 
Posts: 212
Joined: February 9th, 2012, 1:39 am
Location: Bartlett, TN, USA
Forum Language: English (United States)
Hero:
Evil Sorcerer: Zargon
Usergroups:
Adventurers' Guild Group Member Champion Group Member

WAAAGH! Quest 05 - The Bloody Spear Tribe

Postby Thrawn » March 16th, 2012, 1:13 am

"After weeks of searching, you have tracked down Gorefist's emmissary to the Bloody Spear tribe. He has sent his younger brother, Rurpik Gorefist to meet with a Night Goblin Shaman known as Rotface. If the heroes can manage to slay Rurpik or Rotface, they can stop the Bloody Spear Night Goblins from pledging their forces to Warboss Gorefist's invasion. The hard part is still to come however, as Night Goblins are known for their cunning, and traps and ambushes apleanty likely await ahead."

Image


A - The staircase leads down into the den of Rotface's night goblins. Beyond the door, the heroes can hear the sounds of goblins feasting and brawling.

B - This room is the goblin's main feasting hall. The heros go unnoticed at first as the door swings open, but soon the goblins catch on to their presense and grab their weapons. 3 rounds after the battle starts in this room, the doors to the areas marked "C" all swing open as more goblins look to join the battle.

C - These are the living quarters of the goblin tribe including rooms for sleeping and the kitchen. The trapped chest has an arrow trap on it, doing one body point of damage to anyone searching that room before disarming it.

D - The secret door to the hall is NOT found if the hero searches the room for secret doors. The secret door is actually in the pit, and the hero must search for secret doors from inside the pit to find this way out. The secret door can be found from the hallway side as normal.

E - This is the chamber of Rotface, a Night Goblin Shaman.
Rotface's Statistics are:
Mv 8, A 2, D 3, B 2, M 4
Can cast the following spells from the Orc Shaman spell list: Orc Berserker, Spirit of Vengeance, Summon Goblins.
The Big'Un in this room is Rurpik Gorefist. He has the statistics of a normal bigun, with except that he has 3 body points instead of 2.

When this room is searched for treasure several items of value will be found:
1) Rotface is wearing a wizard's cloak. See the artifact card for details on this item.
2) On the table is a spell scroll with the spell "Treasure Without Doom". See the artifact card for details on this item.
3) Rurpik Gorefist has a small box with gems worth 100 gold.

F - This is the goblin torture chamber. No victims are currently in here. Instead, the goblins seem to be using the rack as a table for a game of dice. They set the dice aside and attack as the heroes open the door. The heroes can hear loud growls from the porticulis to room G, and silence from the porticulis to room H.

G - This cell is used as the squig pen by the goblins. Bones of former captive are skattered throughout the pen, and the squigs charge enthusiastically as the porticulis is opened.

H - The skeletons in here hang motionless chained to the walls. (They will not animate, but let the heroes be nervous.)

Wandering Monsters:
Common: Night Goblin
Uncommon: Night Goblin Archer
Rare: 2 Night Goblins

Quest End: When word gets back to the border princes, a merchant guild comes up with a reward of 200 gold for the heroes, inviting them to come and collect at an inn called Traveller's Crossing so the merchants can meet them in person.

Personal Notes: I gave out the Wizard's Cloak one quest earlier than the basic quest set, since this quest was more the counterpart of Legacy of the Orc Warlord than Melar's Maze. It introduces the first enemy spellcaster of the campaign, as well as a relative of the main orc warlord of the campaign. (The big difference of course is that the Orc Warlord in this case isn't dead.)

A second item of not in this quest is that it introduces both Squigs and Fanatics. I wanted to do a night goblin themed quest specifically for this reason. My original version also had squig riders, but I cut them out in this version to simplify things a little.

My third item I want to comment on is room D. It uses one of my favorite rules from the rulebook. You can search for treasure and SECRET DOORS in a pit just like it was a separate room. This won't be the last time I'll use this somewhat obscure rule in quest design. Also note that the stairs used in the quest were actually for consistency. The pit is on the same level as the hallway the secret door opens to due to a set of stairs down.
Last edited by Thrawn on March 16th, 2012, 11:58 pm, edited 4 times in total.


Rewards:
Created a Hot Topic.
Thrawn

Ogre Chieftain
Ogre Chieftain
 
Posts: 212
Joined: February 9th, 2012, 1:39 am
Location: Bartlett, TN, USA
Forum Language: English (United States)
Hero:
Evil Sorcerer: Zargon
Usergroups:
Adventurers' Guild Group Member Champion Group Member

WAAAGH! Quest 06 - Trail's Crossing Ambush

Postby Thrawn » March 16th, 2012, 1:13 am

"The heroes have come to the inn of Traveler's Crossing for some well deserved rest, and an even more deserved reward from one of the merchant guilds operating trade routes throughout the Border Prince's kingdoms. After presenting the reward and giving the heroes an opportunity to spend their newfound gold, the merchant caravan went on their way, and things turned for the worst. Orcs and Goblins have invaded the inn, screaming for revenge for Warboss Gorefist's brother, and looking for the Black Axe of Blood River."

Image

Special Rules:
The heroes each start in separate rooms (their inn rooms) marked with thier icon.

On each of Zargon's turns, he must roll two skull dice, and consult the wandering monster table. Place the two indicated monsters on the squares marked "X". If the X squares are blocked, no monsters may be placed.

Since the heroes already know the layout of the inn, the entire board should be revealed before the game starts, including all monsters.

In this quest all doors begin open.

Wandering Monsters:
Common: None
Uncommon: Goblin
Rare: Orc

Quest End: The quest is won when the heroes manage to exit through the double doors by the squares marked "X".

Personal Note: I'm having a harder time converting this quest than any other quest so far. I used a ton of special tiles and furniture to build out an inn when I originally built this, so trying to limit myself to what is in Heroscribe has involved more changes than I've had to do with other quests.

With the restructured rooms and less furniture, I'm not sure if that shifts the balance of the quest. I tried to give about an equal distance necessary to get to the exit, as well as an equal number of possible escape routes. Overall, I think I'll need off-topic playtest this one again more than any quest up to this point. I also dropped all room descriptions. They didn't have any gameplay effect on the quest, they were just fluff that went along with the custom furniture I had used.
Last edited by Thrawn on March 17th, 2012, 1:15 am, edited 4 times in total.


Rewards:
Created a Hot Topic.
Thrawn

Ogre Chieftain
Ogre Chieftain
 
Posts: 212
Joined: February 9th, 2012, 1:39 am
Location: Bartlett, TN, USA
Forum Language: English (United States)
Hero:
Evil Sorcerer: Zargon
Usergroups:
Adventurers' Guild Group Member Champion Group Member

WAAAGH! Quest 07 - The Fires of Thunder Mountain

Postby Thrawn » March 16th, 2012, 1:14 am

"It has become clear that as long as the heroes carry the Black Axe of Blood River, Warboss Gorefist will pursue it. The only choice is to destroy the evil weapon, removing it's threat forever. The dwarves of Karak Varn have delivered on their promise of a future favor, not only determining that the blade can be destroyed by being thrown into the mouth of Thunder Mountain, but also arranging safe passage to the dwarven hold of Karak Palik, which lies at the foot of the mountain. Now it is up to the heroes to get the axe to the summit and cast it in. The way is dangerous though. The mountain is held by the orcs, and far more dangerous creatures are also known to dwell on the mountain."

Image


Special Rules:
Heat Vents - Some wandering monster events will indicate a heat vent. In this case, the hero has walked near a fissure in the mountain that happens to vent hot fumes while they are too close. Roll two skull dice and do one body point of damage for each skull. This can't be defended.

X - The heroes enter the quest here.

A - The orcs in this cave look like they are expecting intruders, and have weapons at ready as you enter.

B - This foul smelling cave is the home of a single ogre. If the room is searched for treasure, among the items in the chest are an old dinged up shield, 30 gold coins, and the Talisman of Lore. See the artifact card for further details on this item.

C - These walkways overlook cliffsides going down the mountain. The heroes must be wary while advancing through these sections. (No actual game effect.)

D - Three large brutish orcs stand at the ready in this chamber. It looks like they may have been assigned to guard the orc band's loot. The chest is trapped by setting it on a heat vent that does damage per the special rules if the room is searched for treasure before the chest is disarmed. The trap is disarmed by pushing the chest one square over to get it off the vent. The chest has 100 gold inside.

E - The gargoyle in this room is stone and does not move unless the heroes try to open the chest. Although the trap on the chest can be identified, it can't be disarmed. The chest contains a magical artifact called orcs bane, long thought lost by the dwarves of the area. See the artifact card for details on this item.

F - The mouth of Thunder Mountain is extremely hot. Each round a hero stands in this room, make a roll as if they had triggered a Heat Vent Wandering monster event. Whoever is carrying the Black Blade of Blood River can throw it in by using an action for the round. The volcano begins to rumble before beggining to spew lava. The Heroes have 5 turns to get past the first section of cliff before lava starts pouring out doing 5 skull dice of damage each turn with no defense possible. Anyone searching for treasure from this point on will automatically trigger a heat vent event as the mountain continues to heat up.

Wandering Monsters
Common: Heat vent (see special rule)
Uncommon: Orc
Rare: Orc Archer

Quest End: Once the axe is thrown in the lava and the heroes escape by returning to the "X", then the quest is over.

Personal Notes: This was another quest where I felt a custom tile was of great importance, so I didn't cut it out. The mouth of the volcano is such a major feature, that I left it in. I personally used a tile similar to the pit on the map, but filled with lava in the center. At some point I may have to try recreating this tile in a non-hardcopy format. I also used two copies of cliff corridors from Kellar's Keep (which only has 1). These corridors are really only asthetic, and can be ignored if you don't have these tiles.

Note that this quest uses both a gargoyle, and an ogre warrior. As single monsters, they likely will seem scarier than they really are, but still give a bigger challenge than run of the mill orcs or goblins.) This is the first time in this quest pack that the gargoyle has been used. The same is true of the ogre.) Orc Big'uns are far more numerous in this quest than in previous quests, and likely will be the greatest threat to the heroes.

I did put two artifacts in this quest. Orc Bane is actually unlikely to be found, while the Talisman of Lore will likely be found.
Last edited by Thrawn on March 17th, 2012, 2:46 am, edited 2 times in total.


Rewards:
Created a Hot Topic.
Thrawn

Ogre Chieftain
Ogre Chieftain
 
Posts: 212
Joined: February 9th, 2012, 1:39 am
Location: Bartlett, TN, USA
Forum Language: English (United States)
Hero:
Evil Sorcerer: Zargon
Usergroups:
Adventurers' Guild Group Member Champion Group Member

WAAAGH! Quest 08 - The Siege of Zenres

Postby Thrawn » March 16th, 2012, 1:14 am

"While the heroes were destroying the Black Axe, Warlord Gorefist was busy as well, starting his invasion even with all of the setbacks his forces have had. Orcs poured out of the World's End Mountains from Mad Dog Pass, attacked several small villages on the way to the county capital of Zenres. Zenres had time to prepare, and fortified itself as best it could, but it will not hold out for long against the orcish forces, especially to due to the bombardment of a number of rock lobbers set up outside the city. The only hope that the city has of surviving until help arrives is if someone can sneak into the orc encampment and sabotage the catapults. Of course, the heroes are perfect for this type of mission, and rumor is that Gorefist has left the rock lobbers in the care of an orc shaman named Blacknose while he attends to other business. Entering the outskirts of the orc held ruins, they must find the three rock lobbers and remove them from action."

Image


A - This room holds one of the Orc rock lobbers along with it's crew and some extra guards. The spaces marked "X" are the locations of the rock lobbers. Once all of the orcs in the room have been killed, the rock lobber can be destroyed by doing at least 5 body points of damage with physical attacks (they don't defend) or are automatically destroyed if targeted with a fire based spell.

B - The monsters in this room seem weary from battle, but still don't hesitate jump towards a fight as the heroes enter.

C - This foul smelling room has been used to hold someone's pet squig. It hasn't been let out in some time, and jumps at the heroes hungrily. The chest is trapped with a special pit trap. If the room is searched before the chest is disarmed, place a pit at the square marked C, and move the searching hero into the pit. Resolve as a normal pit trap. If a hero was already on square C, they have fallen in the pit as well.

D - This room looks to be the orcish armory. It is actually a trap. The weapon rack is actually just reloads for the many spear traps. No thing of value will be found in this room.

E - This ruined building has become the study and headquarters for an orcish shaman called Blacknose who is in charge of the bombardment of Zenres. He begins casting while his huge bodyguards prepare to attack.

Blacknose
Mv 7, A 2, D 4, B 3, M 5
He knows the following orc shaman spells: Orc Berserker, Shield of Protection, Sharpen Blades, Spirit of Vengeance, Summon Orcs
In addition, he can cast 2 spells per turn instead of one

The chest in the room has a fire trap, doing 3 dice of damage to everyone in the room if treasure is searched for before the trap is disarmed.

If treasure is searched for, the following is found:
1) Blacknose is carrying the Spell Ring. See the artifact card for more details on this item.
2) The chest holds 75 gold coins and a parchment with orders from Gorefist. Although it's difficult to decipher (due to both the grammar and writing), it seems to be orders to Blacknose to keep bombarding Zenres while Gorefist leads a small band to a wyvern's lair just north The Iron Rock.
3) On the alchemist's table there are two spell scrolls. One holds the spell "Ball of Flame", and one holds the spell "Fire of Wrath".

Wandering Monsters
Common: Orc
Uncommon: 2 Goblins
Rare: Orc Big'un

Quest End
Once all three rock lobbers are destroyed and the heroes escape back out of the camp, the adventure ends. With relief from the bombardment, Zenres is able to withstand the siege until help arrives in the form of a small dwarven army from Barak Varn. They are able to take the orish forces by surprise, breaking their lines and forcing them into retreat. In recognition of their part in the battle, the City of Zenres gives a reward of 250 gold to the heroes.

Personal Notes:
This was another quest where I had to do some converting. My original used a number of custom tiles making up outdoor areas and some ruins. I actually had all the rock lobbers on raised platforms. I used some Warhammer Fantasy rock lobbers from my orc army originally. As a substituion, the rack is the same size if nothing better is available. The fight in room E was pretty epic when I played through this, and quite challenging.
Last edited by Thrawn on March 17th, 2012, 11:33 pm, edited 2 times in total.


Rewards:
Created a Hot Topic.
Thrawn

Ogre Chieftain
Ogre Chieftain
 
Posts: 212
Joined: February 9th, 2012, 1:39 am
Location: Bartlett, TN, USA
Forum Language: English (United States)
Hero:
Evil Sorcerer: Zargon
Usergroups:
Adventurers' Guild Group Member Champion Group Member

WAAAGH! Quest 09 - Lair of the Wyvern

Postby Thrawn » March 16th, 2012, 1:15 am

"Using the information from the Siege of Zenres, a great opportunity has been spotted. Warlord Gorefist will be vulnerable while he is personally leading a mission seeking a Wyvern Mount to lead his forces into battle. The heros have tracked his band to a cave high on a mountain in the World's Edge Mountains north the fortress of Iron Rock. If he can be killed here, the entire war can be ended before any more damage can be done."

Image

A - The creatures in this room seem to be very much on edge, almost seeming afraid of something. They almost seem releaved that you are the ones they get to fight now. When searching for treasure, one of the goblins has a venom antidote. See the alchemist shop for details on this item.

B - Spiders drop from the ceiling, swarming the heroes and attempting to sink in with their venomous fangs.

C - The orcs here seem to be searching for something, although they don't seem to be searching very hard.

D - Warlord Gorefist is here with some of his orc minions. As the heroes enter the room, he ducks away, ordering his guards to finish them off. He moves to the next room, closing the door behind him. (He'll gain enough distance, that the heroes won't see him again in this quest.)

E - These orcs cover their Warboss's escape, charging right at the heroes.

F - This is the lair of the wyvern, a huge winged reptilian creature with a vicious bite and a poisonous barbed tail. The center of the room has an open ceiling, but the edges of the room look to be crumbling.
The secret door out of this room can't be found searching for secret doors in the room. It can only be found from inside the pit. In addition, if the pit is searched for treasure, Warlord Gorefist had lightened his load to speed his escape, dropping a sack with 100 gold and three daggers. One of the three daggers is a magical throwing dagger. See the artifact card for details.

G - This door exits the lair. Upon exiting, the heroes can see Gorefist fleeing over the horizon.

Wandering Monsters
Common: 2 Giant Spiders
Uncommon: Orc
Rare: Orc Big'un

Quest End
The Quest ends once the heroes leave either by the stairs or the exit door. Warlord Gorefist has escaped, but was prevented from acquiring a mount that would have given him greater mobility and offensive capability in battle.

Personal Notes:
This was the first quest where you actually get to see Warlord Gorefist...and he runs like a coward. This quest is really built around the battle with the wyvern. Hopefully the open middle of the cieling hint will help with the traps in the room. Also remember the wyvern can fly, which allows it to position itself in the room, for greater flexibility. Poison is nasty, and the heroes could possibly find themselves racing for an exit before someone dies of poisoning. ADDED NOTE: If you want to be real nice to your players, I highly suggest reminding your players that Wyvers are poisonous, and that it might be a good idea to get some kind of poison protection (from the alchemist shop.) Between the spiders and the wyvern, there is plenty of poison in this one.
Last edited by Thrawn on April 7th, 2013, 1:26 am, edited 3 times in total.


Rewards:
Created a Hot Topic.
Thrawn

Ogre Chieftain
Ogre Chieftain
 
Posts: 212
Joined: February 9th, 2012, 1:39 am
Location: Bartlett, TN, USA
Forum Language: English (United States)
Hero:
Evil Sorcerer: Zargon
Usergroups:
Adventurers' Guild Group Member Champion Group Member

Next

Return to Quests and Quest Packs

Who is online

Users browsing this forum: No registered users and 2 guests