Good call on the Sandstone for the dungeon elements, they look great.
maj!
-
- Advertisement
Make a small donation to Ye Olde Inn!
Every cent received goes toward Ye Olde Inn's maintenance and allows us to continue providing the best resources for HeroQuest and Fantasy Gaming fans.
My minis
Re: My minis
![]() by QorDaq » March 29th, 2016, 1:01 am
by QorDaq » March 29th, 2016, 1:01 am
maj! = Klingon word for "Good". Used in the context of "I approve".
- vay' DaneHbogh yIchargh!
- vay' DaneHbogh yIchargh!
-

QorDaq
Elven Warrior
- Posts: 610
- Joined: March 4th, 2014, 6:09 am
- Location: U.S.
- Forum Language: English (United States)
- Hero:

- Evil Sorcerer: Zargon
- Usergroups:


Advertisement
Make a small donation to Ye Olde Inn!
Every cent received goes toward Ye Olde Inn's maintenance and allows us to continue providing the best resources for HeroQuest and Fantasy Gaming fans.
Re: My minis
![]() by Anderas » March 29th, 2016, 7:14 am
by Anderas » March 29th, 2016, 7:14 am
The Road Warrior wrote:+1 for the stone. I would love I see a step by step tutorial as stone is something that has always troubled me.
Step by step; i guess there the exact colors are also important:
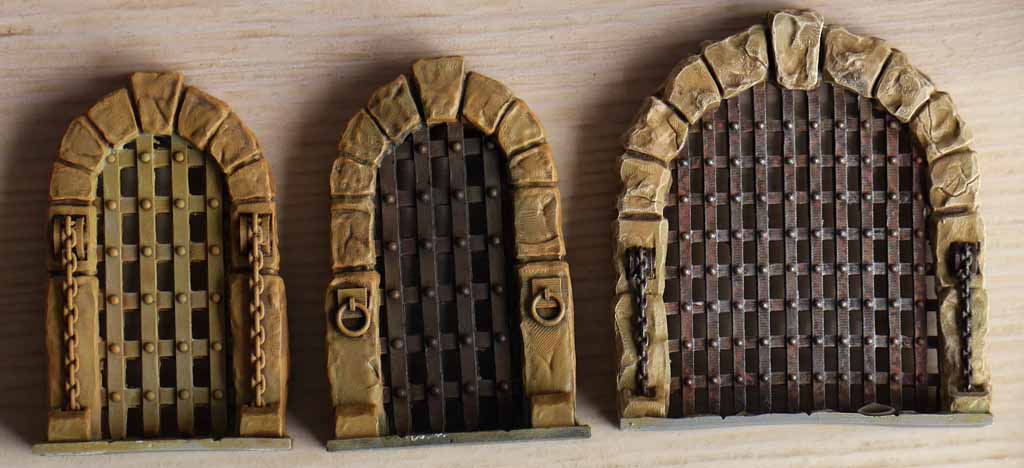
* Buy Doorways from Thantos
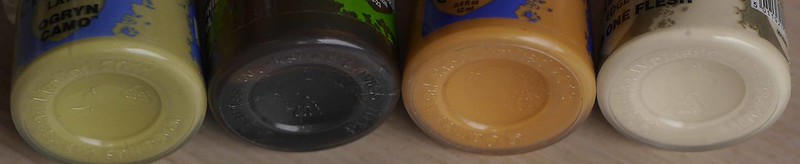
* Put GW Ogryn Camo (light desaturated green) with Vallejo "Diluant" in the airbrush and make a good base cover with it. (sorry i don't know the english name for that... it's NOT just thinner, it is also the acrylic medium itself inside... It makes that the thick GW color fits through the small airbrush muzzle)
As an airbrush is somehow always too full for a single miniature, do this step for 10 or 15 Doors at a time.
* Use some heavy layer of Sepia (i used my very old, OLD GW Gryphonne Sepia)
The Sepia fills the gaps and recesses with dark color, a thing that normally shall be done by black primer, but i didn't use primer. However, the washes normally take their time to dry, so i am lucky here that i did 15 doors at a time - i could continue even when the others were not yet dry. After 15 doors, it was still not completely dry, so i was making something to eat for my wife and kid.
* Open your favorite GW orange and see that it is dried out because i didn't close it properly half a year ago.
* open a new can of your favorit GW orange and see that it is still fresh.
* Tau "Light Ocre" is the name of this particular orange. It doesn't scream like fluorescent orange, and it is quite thin, and leans a little bit on the yellow side. GW-typical, it is not at all desaturated but quite colored, so the de-saturation had to be done by the underlying green. This was why i was using it.
I put it on the wet palette, because i still think it was too thick. Then i did a very rough, non-clean step of not-dry drybrushing. Normally you avoid having not-dry brushes for drybrushing, i didn't, because i wanted the orange to be everywhere. Nevertheless, i did not PAINT it very carefully like i normally do with miniatures, but i used the brush like in drybrushing - putting the color about everywhere, just sparing the recesses filled with sepia. I repeated that step maybe two or three times, caring that the brush was a little bit dryer each time.
In the recesses, where the orange was not so thick, the orange and green mix to a desaturated grey-ish yellow. In the parts more to the front, it is really orange now. It the corners, it is still green. That's cool because it transports the unhealthy environment a cellar or dungeon represents.
* Last Color was a very light yellowish beige/khaki. I was just looking up the GW Name: "Flayed one flesh". Well. I guess any name will do.
That color was applied via drybrushing, the real drybrushing, careful to have not one trace too much on the brush because i didn't want to leave stripes. The color takes away the strongest orange accents, and adds these stone-like bright breaking lines that you have very often on dry stone.
Finally, to have a good contrast and stay in the warm color scheme, i added dark brown to all metal parts, dotted it with two different orange colors so that it really appears to be super-rusty, and brushed very gently with a dark metal tone of Vallejo. Just so much that you could see "here was metal once" but light enough to let the rust shine through everywhere.
I love it. It just set my dungeon stone color standard.
I have the color pots here for a visual impression and some of the painting steps. As said, i did a lot of them as batch painting, so i don't have all the intermediate steps here.
Last edited by Anderas on March 29th, 2016, 1:36 pm, edited 1 time in total.
Inndex of Quests
My Heroquest Game Cards
The Questimator
the font HQModern
StratosVX' updated Quest files
Our version of Heroscribe hosted by Stratos
My Heroquest Game Cards
The Questimator
the font HQModern
StratosVX' updated Quest files
Our version of Heroscribe hosted by Stratos
Rewards:


 Miniature Exchanges.")
 Miniature Exchanges.")


-

Anderas
NOT Andreas!
Polar Warbear
- Posts: 3397
- Images: 73
- Joined: September 20th, 2014, 7:02 am
- Forum Language: British English
- Hero:

- Evil Sorcerer: Morcar
- Usergroups:


Re: My minis
![]() by knightkrawler » March 29th, 2016, 7:40 am
by knightkrawler » March 29th, 2016, 7:40 am
It's a really, really good recipe. I hope I'll remember to use it somewhere in my dungeon.
One major gripe though: It's brush for Pinsel, not pen. A pen is a Kugelschreiber, among other things.
One major gripe though: It's brush for Pinsel, not pen. A pen is a Kugelschreiber, among other things.
HQ - Heroes & Villains (Dropbox-download link) https://www.dropbox.com/sh/jgj0kzsys9w38oh/AAA_VEHx6vMv4HKRX7IiOWTFa?dl=0
Feedback http://forum.yeoldeinn.com/viewtopic.php?f=38&t=3560
Gallery http://forum.yeoldeinn.com/viewtopic.php?f=56&t=1972&hilit=knightkrawler+gallery&start=200
____________________________________________________________________________________________________________
I've found a way of paying off old debts:
Always make more promises than you can break.
Rewards:


-

Cheese Baron
knightkrawler
The Furry Blue Derailer
Witch Lord
- Posts: 5822
- Images: 27
- Joined: May 25th, 2012, 2:26 pm
- Location: Regensburg, Germany
- Forum Language: English (United States)
- Hero:
- Evil Sorcerer: Morcar
- Usergroups:
Re: My minis
![]() by Anderas » March 29th, 2016, 8:12 am
by Anderas » March 29th, 2016, 8:12 am
Ah merde I was of course not using a Kugelschreiber this time. 
I will have to correct some words I guess.
I will have to correct some words I guess.
Inndex of Quests
My Heroquest Game Cards
The Questimator
the font HQModern
StratosVX' updated Quest files
Our version of Heroscribe hosted by Stratos
My Heroquest Game Cards
The Questimator
the font HQModern
StratosVX' updated Quest files
Our version of Heroscribe hosted by Stratos
Rewards:
-
Anderas
NOT Andreas!
Polar Warbear- Posts: 3397
- Images: 73
- Joined: September 20th, 2014, 7:02 am
- Forum Language: British English
- Hero:
- Evil Sorcerer: Morcar
- Usergroups:
Re: My minis
![]() by knightkrawler » March 29th, 2016, 9:21 am
by knightkrawler » March 29th, 2016, 9:21 am
Anderas wrote:Ah merde I was of course not using a Kugelschreiber this time.
I will have to correct some words I guess.
There are mini painters out there using very fancy techniques.
I love your French Artist's "Ah merde!"
HQ - Heroes & Villains (Dropbox-download link) https://www.dropbox.com/sh/jgj0kzsys9w38oh/AAA_VEHx6vMv4HKRX7IiOWTFa?dl=0
Feedback http://forum.yeoldeinn.com/viewtopic.php?f=38&t=3560
Gallery http://forum.yeoldeinn.com/viewtopic.php?f=56&t=1972&hilit=knightkrawler+gallery&start=200
____________________________________________________________________________________________________________
I've found a way of paying off old debts:
Always make more promises than you can break.
Feedback http://forum.yeoldeinn.com/viewtopic.php?f=38&t=3560
Gallery http://forum.yeoldeinn.com/viewtopic.php?f=56&t=1972&hilit=knightkrawler+gallery&start=200
____________________________________________________________________________________________________________
I've found a way of paying off old debts:
Always make more promises than you can break.
Rewards:
-
Cheese Baron
knightkrawler
The Furry Blue Derailer
Witch Lord- Posts: 5822
- Images: 27
- Joined: May 25th, 2012, 2:26 pm
- Location: Regensburg, Germany
- Forum Language: English (United States)
- Hero:
- Evil Sorcerer: Morcar
- Usergroups:
Re: My minis
![]() by Anderas » March 29th, 2016, 1:37 pm
by Anderas » March 29th, 2016, 1:37 pm
I think the real south french would have said "Putain"  So it was kind of Frangleman.
Inndex of Quests
My Heroquest Game Cards
The Questimator
the font HQModern
StratosVX' updated Quest files
Our version of Heroscribe hosted by Stratos
My Heroquest Game Cards
The Questimator
the font HQModern
StratosVX' updated Quest files
Our version of Heroscribe hosted by Stratos
Rewards:
-
Anderas
NOT Andreas!
Polar Warbear- Posts: 3397
- Images: 73
- Joined: September 20th, 2014, 7:02 am
- Forum Language: British English
- Hero:
- Evil Sorcerer: Morcar
- Usergroups:
Re: My minis
![]() by Sjeng » March 29th, 2016, 4:08 pm
by Sjeng » March 29th, 2016, 4:08 pm
I love that word... I always think of it when President Putin is in the news  (I don't much like the man).
That sandstone is amazing! definitely will use that one day. Good job!
That sandstone is amazing! definitely will use that one day. Good job!
Check out my YouTube channel Boardgame Heaven, and drop me a sub please!
Rewards:

 articles for the Blog in three (3) sections.")


-

Official Spokesman
Sjeng
Ye Olde Orcish Bard
Chaos Warlock
- Posts: 4522
- Images: 92
- Joined: July 26th, 2011, 9:58 am
- Location: The Netherlands
- Forum Language: Nederlands
- Hero:
- Evil Sorcerer: Morcar
- Usergroups:

Re: My minis
![]() by Thantos » March 30th, 2016, 5:53 am
by Thantos » March 30th, 2016, 5:53 am
Awesome paintjob great to see these brought to life!
http://www.zealotminiatures.com
Models. Plastic Injection. Resin Casting. High Res 3D Printing . Macro 3D Scanning .
Models. Plastic Injection. Resin Casting. High Res 3D Printing . Macro 3D Scanning .
Rewards:
 Miniature Exchanges.")
-

Thantos
Giant Wolf
- Posts: 777
- Images: 0
- Joined: September 12th, 2013, 6:28 am
- Location: UK
- Forum Language: British English
- Hero:
- Evil Sorcerer: Zargon
- Usergroups:
Re: My minis
![]() by Anderas » March 30th, 2016, 7:45 am
by Anderas » March 30th, 2016, 7:45 am
I can make some photos on white background for your Webshop if you want.
Inndex of Quests
My Heroquest Game Cards
The Questimator
the font HQModern
StratosVX' updated Quest files
Our version of Heroscribe hosted by Stratos
My Heroquest Game Cards
The Questimator
the font HQModern
StratosVX' updated Quest files
Our version of Heroscribe hosted by Stratos
Rewards:
-
Anderas
NOT Andreas!
Polar Warbear- Posts: 3397
- Images: 73
- Joined: September 20th, 2014, 7:02 am
- Forum Language: British English
- Hero:
- Evil Sorcerer: Morcar
- Usergroups:
Re: My minis
![]() by Thantos » March 31st, 2016, 10:25 am
by Thantos » March 31st, 2016, 10:25 am
That would be great thanks
We had some professional photos for the store done with the first shoot on wednesday, and will be putting these in the store shortly.
Will definitely add some painted pics to a site gallery!
We had some professional photos for the store done with the first shoot on wednesday, and will be putting these in the store shortly.
Will definitely add some painted pics to a site gallery!
http://www.zealotminiatures.com
Models. Plastic Injection. Resin Casting. High Res 3D Printing . Macro 3D Scanning .
Models. Plastic Injection. Resin Casting. High Res 3D Printing . Macro 3D Scanning .
Rewards:
-
Thantos
Giant Wolf- Posts: 777
- Images: 0
- Joined: September 12th, 2013, 6:28 am
- Location: UK
- Forum Language: British English
- Hero:
- Evil Sorcerer: Zargon
- Usergroups:
Who is online
Users browsing this forum: No registered users and 3 guests