and Quest's 8 & 9...
 Quest 8 - The Screaming Spectre
The Barbarian & Dwarf's Tale (continued)..."You have teamed up, Barbarian and Dwarf, all the better to hunt down the vile orc witch, Ghashlug, and her band of acolytes. After days of pursuit, you draw near to the Pillars of the Sky, the mountain range in the far north of the world.
As the Dwarf, you have had time to reflect on your situation. Where you thought you had been angry before, what you had in fact been experiencing was in fact mere Dwarvish indignation. What you are feeling now is red, blood-simmering, ear-pounding, nostril-cracking, honest-to-goodness stark, [i]rage...simple slaughter was no longer on the agenda; you need to apply some really creative violence in dealing with these orcs (and Grinch & Grivois, for that matter).
As the Barbarian, you have also had time to ponder. Nothing can restore the slain members of your tribe to life, but at least they can rest with honour after your defeat of the orcs of Stalag Tor. Your Norse gods have woven for you a future without hearth or kin; you have become what the Valrings call a 'wave-man', tossed to and fro by fate. You seem to be caught up now in a story bigger than yourself. As if to cement the strange feeling, in the early hours you saw a very strange sight; a flying carpet speeding over your heads, carrying what looked like an Elf and a Wizard, both desperately trying to hold on as a snow blizzard buffeted their bizarre mode of transportation. With your new ally the Dwarf, you set off in the same direction, with a nagging feeling that somehow this freakish event is linked with your overall purpose..."[/i]
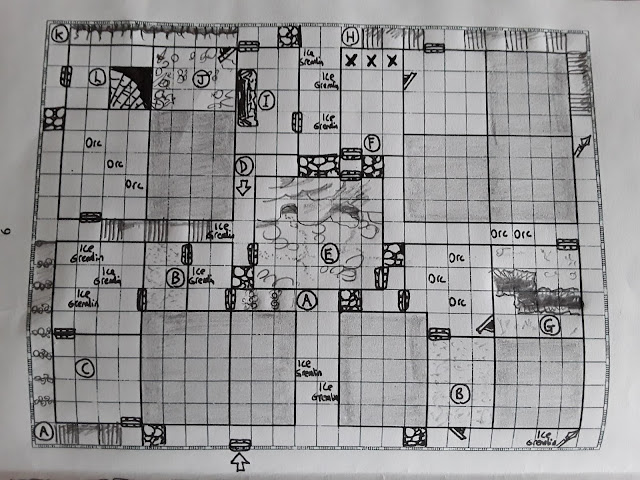
Notes - This Quest is for the Barbarian and Dwarf Heroes. The Elf and Wizard will also be encountered, as the four Heroes fates finally become interwoven. The Heroes must cross over the Pillars of the Sky. Ice Gremlins infest these mountains; they have the stats - Move 10, Attack 2, Defend 3, Body 2, Mind 3, and may steal items as described in The Frozen Horror expansion.
A - Use the Ice River tiles from
The Frozen Horror. Each square of the tile counts as 2 for movement purposes. Whenever a Hero enters an Ice River, or begins his turn there, he must roll 1 combat die; on a white shield he loses 1 Body Point.
B - Use the Ice Vault tiles from
The Frozen Horror. The wind here is strong as it whips through the teeth of the mountains. Unless a Hero is wearing warm furs, he loses 1 Body Point from exposure for each turn he is in the room.
C - The Elf & Wizard Heroes are encountered here. Their magic carpet crashed into the mountainside during the blizzard. The Barbarian and Dwarf pull them out of the snow; they are half-dead, with only 1 Body Point each, and will need to use their healing spells to recover. The Wizard tells his rescuers all about Kyrax, their understanding helped by the fact that they already know all about the orc witch and her acolytes. The Heroes will now have to work together to get over the high mountain pass in order to get to Mount Anger, the dwelling place of the great demon, Kyrax.
D - The Heroes are now at the top of the pass. As soon as the last Hero passes through the door into room E, a large avalanche is triggered from symbol D, and moves in the direction of the arrow. The corridors outside room are permanently blocked as per falling block traps, by tons of ice and snow. Any monster still in the corridors is killed.
E - Use the Snow Cave Entrance tile from
The Frozen Horror here. Once avalanche D is triggered, this room is also at great risk from a second avalanche cascading off the mountainside. Tell all Heroes that another avalanche is bearing down on top of them, and that they should hurry. Any Hero who cannot exit from room E by the end of this turn, loses 2 Body Points and one of their items/equipment selected at random. They may now only move 2 spaces per turn, whilst on this tile, now that it is buried in deep snow.
F - This cave is in pitch black darkness, thanks to the entrance being covered by the avalanche. The Dwarf will be able to see fine thanks to his night vision, but the other Heroes cannot see anything unless one of them has a Lantern, or the Wizard sacrifices a Fire spell. Whilst in darkness, the room cannot be searched for treasure and a square can only be searched for secret doors if a Hero (other than the Dwarf) is actually standing in it. On the evil Wizard's turn, place three Stone Creatures on the X's (or adjacent if these squares are occupied). These monsters have Move 4, Attack 3, Defend 5, Body 2, Mind 1. If the room is in darkness, a Hero can only attack them by rolling one combat die. However, if the Stone Creatures are hit by
Thor's Hammer, double damage is caused.
G - Use the Ice Chasm tile from
The Frozen Horror here. The chasm can be jumped as a pit, but a character is killed if they fall in. The Heroes can all cross safely if a Rope is used here, but the item is then lost.
H - The Ice Gremlins have constructed a magic trap in the square marked H. It can only be detected using the
Scrying Glass, and is immediately disarmed upon detection. If not detected in this way, the first Hero to move into the square must roll one combat die; if he rolls a skull he is magically encased in Ice. A fire spell must be sacrificed in order to get the Hero out (or a potion of Warmth or Magic Resistance), otherwise he is killed.
I - This is an abandoned hut on the mountainside. The Heroes must stop here for the night as a storm is coming up, and it is getting too dark to continue down the pass anyway. All Heroes regain 1 Body Point as they fall into an exhausted sleep. They are about to have a visitor however; a Hantu demon has been preying on the travellers in this region. On Morcar's turn, tell the Heroes that they are awakened by a ear-splitting scream. A hideous bone-white face appears upside down in the hearth, grinning like an open grave. Giggling madly, the Hantu now assaults all Heroes to the core of their being; body and soul. Each Hero rolls one combat die per mind point; if he cannot roll a white shield he is frozen in fear and will not be able to move, attack or defend until the Hantu is defeated. The Hantu has Move 10, Attack 4, Defend 2, Body 3, Mind 6. Don't tell the Heroes, but the demon can only be harmed with spells and magic artefacts. However, if a Hero has the
Courage spell cast on him, he may attack the Hantu even with normal weapons. Holy water will also harm this demon, causing the loss of 1 Body Point. Once, the Hantu is destroyed, the storm and morning both break, and the Heroes can continue on their way.
J - Use the Ice Gremlin Loot tile from
The Frozen Horror here. A Hero in this room may take back any items previously stolen by the Ice Gremlins. In addition, they will also find the magic artefact
Talisman of Vigor. The Wizard will recognise it as belonging to his mentor, Archmage Matholem. Matholem must have passed this way with the other adepts of the School of Magic, on their way to Mount Anger to prevent Kyrax's re-awakening.
K - Use the Grin's Crag tile from
Kellar's Keep here. From this rocky ledge the Heroes can see a glacier winding around the flank of Mt Anger. Tell the Heroes' that they can see a monstrous shape inside the glacier; a leviathan suspended in the ice, silver, winged, with massive serpentine coils. The beast is almost as large as Mt Anger itself, and can only be the sleeping demon, Kyrax!
L - This is the entrance into Mt Anger. Somebody has already broken the magical seal above the entrance. No doubt it was the mad witch, Ghashlug.
When the Heroes descend into the mountain using the stairway, Quest 8 is complete.
Wandering monster - Ice Gremlin
 Quest 9 - The Fellowship of Four
The Heroes' Tale (continued)..."Four companions descend down a narrow stairway into the bowels of Mt Anger. At last, you have come to this forbidding cavern at the roof of the world, where long ago a cabal of wizards bound the demon Kyrax beneath rock and ice.
The Elf enters first, creeping like a cat, hair as fine as spider-silk waving in the up-draught, his eyes like distant stars. His shadow on the stairs makes as much noise as he does.
Behind him the Dwarf - with no need of light, his eyes like pools of jet, drinking in the darkness and grinning fiercely as he prepares to walk into the subterranean vaults.
Next comes the Barbarian - warrior of the cold plains, now stripped of his heavy furs and wearing just a loin cloth, more appropriate to the innards of the mountain, revealing a strong sleek torso with muscles like coils of steel.
And finally the Wizard - his once fine robes now hanging in grubby tatters having been shipwrecked, scaled a mountain range, borne through the sky on a magic carpet, and fought off all manner of foes. Keenly aware that his own frivolity had caused him to fail his aged master and his fellow adepts, now resolved to make amends and come to their aid. He has sworn to prevent the demon Kyrax's reification, even at the cost of his own life.
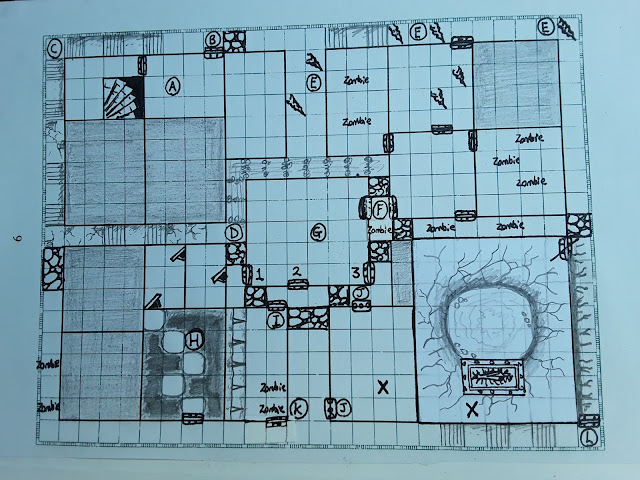
You are the fellowship of four; the end of the world beckon's should you fail..."Notes - This Quest is for all four Heroes. It takes place in the caverns below Mt Anger. The obstacles here were placed by the ancient wizards to discourage anybody wishing to release the demon. The Heroes start at the stairway and must make their way to Kyrax's chamber. Treasure searches are not permitted in this Quest, as the task is to too urgent for any Hero to stop for loot.
A - The corpses of Grinch & Grivois lie here, apparently slain by the orcs as an offering to Kyrax. The Dwarf will not be able to take revenge on the pair, and the treasure map isn't with their bodies.
B - When the last Hero moves through this door, Grinch & Grivois rise as zombies, ready to attack. It appears that the orc witch can raise the dead, and has placed these here to deter pursuit.
C - A long winding staircase leads down into the earth. Steam comes off the steps as the ice that has encased them for centuries melts. Something seems to have happened far below to make the ice thaw. The stair tiles are interspersed with slippery ice tiles from
The Frozen Horror. For each square of Ice tile that a Hero moves through, he must roll a combat die; he slips and loses 1 Body Point on the roll of a black skull.
D - Use the Ice River tiles from
The Frozen Horror. They have been formed by the ice melting from above. Each square of the tile counts as 2 for movement purposes. Whenever a Hero enters an Ice River, or begins his turn there, he must roll 1 combat die; on a white shield he loses 1 Body Point.
E - The stalactites are also melting. These cannot be detected or disarmed. The stalactite falls on the first Hero to walk through one of these squares, and he loses 1 Body Point on the roll of a skull on one combat die.
F - Use a stone doorway as an entrance into the central chamber. The doorway is filled with a huge stone plug of tremendous weight. It can only be shifted with a
Genie spell, or by the Barbarian and Dwarf acting in concert with the Dwarf's pickaxe (if he still has it), in which case the pickaxe is destroyed and both Heroes lose 1 Body Point from the sheer strain. In either case, the stone plug will fall back into place after the last Hero has passed through, blocking the route back out of the mountain.
G - It is noticeably hotter after passing through the stone plug. The source of the heat is coming from the lower caverns. Carved above door number 1 are the words "PATH OF TENEBROSITY". Above door 2 is written "PATH OF CONFRICATION", and above door 3 it says "PATH OF SCIOMACHY".
H - Use the Stepping Stone tile here. The steps hang above a pitch black abyss. Each time a Hero wishes to move from one stepping stone to the next he must roll a combat die; if he rolls a white shield he loses his footing, falls, and hangs on by his fingertips to the square he just tried to move from, losing 1 Body Point in the process. If a Hero in the room has a lantern, or the Wizard sacrifices a fire spell here, the Heroe's will only slip and fall on the roll of a black shield on one combat die. The Dwarf, with his night vision, will only slip on a black shield regardless. Once a Hero is hanging, he can only be pulled back up by another Hero standing on an adjacent or diagonally adjacent square (using one action). On each of his turns when a Hero is hanging but is not rescued, that Hero loses another Body Point due to the strain of trying to hang on..
I - Use the Wall of Death tile here. At the start of each evil wizard turn, the spiked wall automatically moves one space to the right. Any Hero that is on any square that the Wall of Death moves into is killed, unless there is another empty space that he can jump into (this is a free move of a maximum one square). Once the Wall of Death reaches the right-hand wall, passage through the room will be permanently blocked off.
J - Use Portcullis doors for both doorways in this room. Powerful magic is at work here. As soon as the first Hero steps through the first portcullis into the room, the bars will fall in both doorways, trapping the Hero in the room. No escape is possible at this time, even Pass through Rock will not penetrate the walls of the room, and no interference at all from the other Heroes is possible. A material manifestation of that Hero's unconscious then magically materialises in the square marked X. It represents the dark shadow-self of the Hero, and has the same stats as a
starting Hero of the that type (The Wizard's shadow will have the spells
Ball of Flame,
Tempest & Rock Skin, whilst the Elf's shadow will have
Twist Wood). If the dark adversary is defeated, both portcullis' will open and the Heroes may continue on their way. However, if the Hero is slain, another Hero will have to pass into the room, become trapped, and have to face his own dark shadow.
K - There is a scene of slaughter here. Archmage Matholem and his adepts all lie slain, with crossbow bolts sticking out of them, after an orc ambush. On closer inspection, Matholem is not quite yet dead, and manages to say a few words with his last breath "...Must stop Kyrax...placed down there for a reason...rock like fire...". Matholem then expires, and no spell or potion may revive him.
L - When this door is opened, place the Crag tile, the open doorway and the Pit of Chaos tile all at the same time. Tell the Heroes that they have come upon an incredible scene; a massive cavern so high they cannot see the ceiling, with a rocky ledge extending down to the cavern floor where a large stone sarcophagus sits beside a boiling pool of lava. The huge chains that once held the sargophagus shut have been broken by the orcs, and the evil essence of Kyrax now begins to slowly ebb out where it will seek to fill it's former monstrous body lying in the glacier on the other side of the cavern wall.
Ghashlug the orc witch stands on the X, and you may place the same number of orcs that survived the battle with the Dwarf at the end of Quest 6 anywhere on the Pit of Chaos tile. Up to 3 of the orcs can be given crossbows.
Ranged weapons and spells can target enemies from the crag to the cavern floor, and vice versa. Passage between the crag and the pit of chaos is only possible through the open door, unless a Hero has a Rope, in which case he can shimmy down, using up his movement and action for the turn.
Ghashlug has these stats - Move 7, Attack 3, Defend 5, Body 5, Mind 7, as well as the Chaos spells
Firestorm &
Tempest, and the WOM spells
Strands of Binding, Orc Berserker &
Raise the Dead (zombies will be raised rather than skeletons).
Ghashlug will not use
Firestorm until a) she has no spells or minions left, or b) she is reduced to 2 Body Points or less. When she uses this spell it will unintentionally also ignite the lava in the pit; the floor cracks and the sarcophagus will fall in, destroying the essence of Kyrax before it can escape its tomb! ("Rock like fire"). Unfortunately, the cavern begins to collapse as well...
Aftermath - All remaining orcs are slain by falling rock, except for Ghashlug. She pulls out a magical "Journey bag" that can teleport it's owner far away, and jumps in. Before she can fully teleport, the Heroes race over and one of them severs her hand as she attempts to close the bag behind her. The Journey Bag sends its user to a different location every time, and there is no knowing where it might take the Heroes, but they have no choice but to use it. The survivors jump in just as hundreds of tons of molten rock falls on them.
Tell the Heroes that they have teleported far away from Mt Anger. They are on a dark, wet moor, but far away from Norsca judging by the climate. There is no sign of the orc witch. They might not know where they are, but right now they are in no immediate danger, and can take pleasure from the fact that they just saved the entire world from eternal winter...
Wandering monster - Not applicable
 Miniature Exchanges.")


 's = a hit houserule on a monster using a partially wooden weapon, yes?
 and then switched to a dagger, rolling
  for a successful switch. Other
  blocked. He rolls a
  .
. .
.  thanks to Double Image and avoided any damage.
  .
. , so he had to drink his other Healing Salve. But finally the